 View on GitHub
 Integration Reference
Integration
Gini Bank provides an information extraction system for analyzing health invoices and transfers them to the iOS banking app, where the payment process will be completed.
The Gini Bank SDK for iOS provides functionality to upload the multipage documents with mobile phones, accurate line item extraction enables the user to to pay the invoice with prefferable payment provider.
Payment functionality
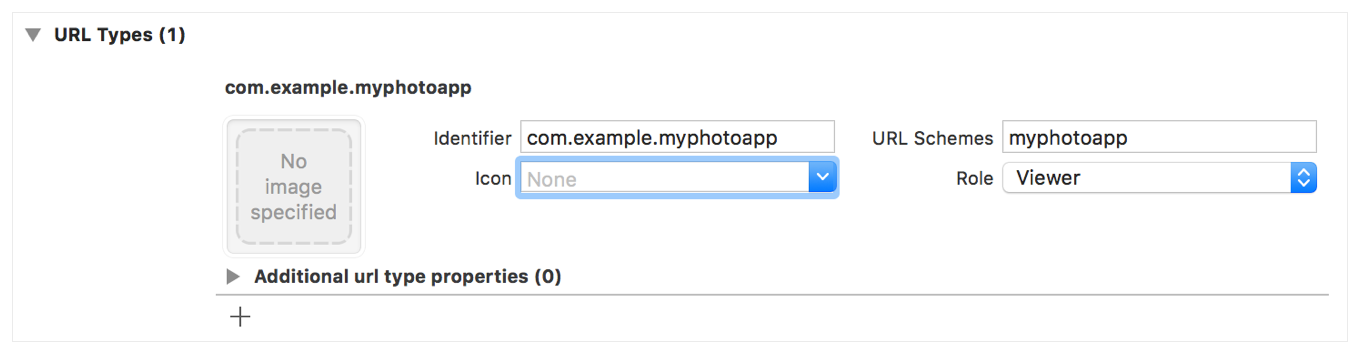
Note For supporting your banking app as a payment provider you need to register Gini Pay URL scheme in you in your Info.plist file. Gini Pay URL schemes for specification will be provided by Gini.
GiniBankAPI initialization
If you want to use a transparent proxy with your own authentication you can specify your own domain and add AlternativeTokenSource protocol implementation:
 let apiLib =  GiniBankAPI.Builder(customApiDomain: "api.custom.net",
                                 alternativeTokenSource: MyAlternativeTokenSource)
                                 .build()
The token your provide will be added as a bearer token to all api.custom.net requests.
Optionally if you want to use Certificate pinning, provide metadata for the upload process, you can pass both your public key pinning configuration (see TrustKit repo for more information)
    let giniApiLib = GiniBankAPI
        .Builder(client: Client(id: "your-id",
                                secret: "your-secret",
                                domain: "your-domain"),
                 api: .default,
                 pinningConfig: yourPublicPinningConfig)
        .build()
⚠️ Important
- The document metadata for the upload process is intended to be used for reporting.
GiniBank initialization
Now that the GiniBankAPI has been initialized, you can initialize GiniBank
let bankSDK = GiniBank(with: giniApiLib)
and receive the payment requestID in AppDelegate. For handling incoming URL, please use the code snippet below.
func application(_ app: UIApplication,
                     open url: URL,
                     options: [UIApplication.OpenURLOptionsKey: Any] = [:]) -> Bool {
        receivePaymentRequestId(url: url) { result in
            switch result {
            case let .success(requestId):
                self.paymentRequestId = requestId
            case .failure:
                break
            }
        }
        return true
    }
Fetching payment information
After receiving the payment request id you can get fetch the payment information:
bankSDK.receivePaymentRequest(paymentRequestId: appDelegate.paymentRequestId)
The method above returns the completion block with the struct PaymentRequest, which includes recipient, iban, amount and purpose fields.
Resolving payment request
bankSDK.resolvePaymentRequest(paymentRequesId: appDelegate.paymentRequestId,
                                 paymentInfo: paymentInfo)
The method above returns the completion block with the struct ResolvedPaymentRequest, which includes requesterUri for redirecting back to the payment requester’s app.
Redirecting back to the payment requester app
If the payment request was successfully resolved you can allow the user redirect back to the payment requester app:
bankSDK.returnBackToBusinessAppHandler(resolvedPaymentRequest: resolvedPayment)
Gini Bank Scheme For Your App
In order for your banking app to be available as a payment provider and support the Gini Pay Connect functionality, you need to register a URL scheme for your app known by the Gini Bank API.
You should already have a scheme and host from us. Please contact us in case you don’t have them.
The following is an example for the scheme ginipay-bank://

Testing
An example health app is available under the link.
In order to test using our example health app, you need to use development client credentials. This will make sure that the Gini Health SDK uses a payment provider which will open your development banking app.
To inject your Gini Bank API credentials into the health example app you need to fill in your credentials
You also need to replace the ginipay-bank URL scheme in the example health app’s LSApplicationQueriesSchemes in the Info.plist with the Gini Pay URL scheme we provided for your banking app.
End to end testing
After you’ve set the client credentials in the example health app and installed it on your device you can start the payment flow with a document import or by taking a photo.
After following the integration steps above your banking app will be launched and you’ll be able to fetch the payment request, show the payment information and resolve the payment after the transaction has been confirmed. At this point, you may redirect back to the health app.
With these steps completed you have verified that your app, the Gini Bank API, the Gini Health SDK and the Gini Bank SDK work together correctly.
Testing in production
The steps are the same but instead of the development client credentials, you will need to use production client credentials. This will make sure the Gini Health SDK receives real payment providers including the one which opens your production banking app.
For testing the flow using the example health app you will need to add your banking app’s production Gini Pay URL scheme to LSApplicationQueriesSchemes in the example health app’s Info.plist. Also please make sure that production client credentials are used before installing it.
You can also test with a real health app. Please contact us in case you don’t know which health app(s) to install for starting the payment flow.
Photo payment functionality
The SDK provides a custom UIViewController object, which should be shown by your app. It handles the complete process from showing the onboarding until providing a UI for the analysis.
Note: You need to specify the NSCameraUsageDescription key in your Info.plist file. This key is mandatory for all apps since iOS 10 when using the Camera framework.
Also if you’re using the Gini Bank API Library you need to add support for “Keychain Sharing” in your entitlements by adding a keychain-access-groups value to your entitlements file. For more information see the Integration Guide of the Gini Bank API Library.
Gini Bank SDK offers two different ways of implementing networking:
- Default Networking (Recommended)
- Custom Networking
Default Networking (Recommended)
Using this method you don’t need to care about handling the analysis process with the Gini Bank API Library, you only need to provide your API credentials and a delegate to get the analysis results.
let viewController = GiniBank.viewController(withClient: client,
                                               configuration: giniBankConfiguration,
                                               resultsDelegate: giniCaptureResultsDelegate)

present(viewController, animated: true, completion: nil)
Optionally if you want to use Certificate pinning, provide metadata for the upload process, you can pass both your public key pinning configuration (see TrustKit repo for more information), the metadata information and the API type (the Gini Pay API is used by default) as follows:
Certificate Pinning
import TrustKit

let yourPublicPinningConfig = [
    kTSKPinnedDomains: [
    "pay-api.gini.net": [
        kTSKPublicKeyHashes: [
        // old *.gini.net public key
        "cNzbGowA+LNeQ681yMm8ulHxXiGojHE8qAjI+M7bIxU=",
        // new *.gini.net public key, active from around June 2020
        "zEVdOCzXU8euGVuMJYPr3DUU/d1CaKevtr0dW0XzZNo="
    ]],
    "user.gini.net": [
        kTSKPublicKeyHashes: [
        // old *.gini.net public key
        "cNzbGowA+LNeQ681yMm8ulHxXiGojHE8qAjI+M7bIxU=",
        // new *.gini.net public key, active from around June 2020
        "zEVdOCzXU8euGVuMJYPr3DUU/d1CaKevtr0dW0XzZNo="
    ]],
]] as [String: Any]

let viewController = GiniBank.viewController(withClient: client,
                                               configuration: giniBankConfiguration,
                                               resultsDelegate: giniCaptureResultsDelegate,
                                               publicKeyPinningConfig: yourPublicPinningConfig,
                                               documentMetadata: documentMetadata,
                                               api: .default)

present(viewController, animated: true, completion:nil)
⚠️ Important
- The document metadata for the upload process is intended to be used for reporting.
- Certification pinning requires iOS 12.
Retrieve the Analyzed Document
The AnalysisResult returned in GiniCaptureResultsDelegate.giniCaptureAnalysisDidFinishWith(result:, sendFeedbackBlock:)
will return the analyzed Gini Bank API document in its document property.
When extractions were retrieved without using the Gini Bank API, then the AnalysisResult.document will be nil. For example when the
extractions came from an EPS QR Code.
Custom Networking
You can also provide your own networking by implementing the GiniCaptureNetworkService and GiniCaptureResultsDelegate protocols. Pass your instances to the UIViewController initialiser of GiniCapture as shown below:
let viewController = GiniBank.viewController(importedDocuments: visionDocuments,
                                            configuration: giniBankConfiguration,
                                            resultsDelegate: resultsDelegate,
                                            documentMetadata: documentMetadata,
                                            trackingDelegate: trackingDelegate,
                                            networkingService: networkingService)


present(viewController, animated: true, completion: nil)
We provide an example implementation here.
You may also use the Gini Bank API Library or implement communication with the Gini Bank API yourself.
Cleanup and Sending Feedback
Your app should clean up the SDK and provide feedback for the extractions the Gini Bank API delivered. Feedback should be sent only for the extractions the user has seen and accepted (or corrected).
We provide a sample test case here to verify that extraction feedback sending works. You may use it along with the example pdf and json files as a starting point to write your own test case.
The sample test case is based on the Bank API documentation’s recommended steps for testing extraction feedback sending.
For additional information about feedback see the Gini Bank API documentation.
func stopGiniBankSDK() {
    // After the user has seen and potentially corrected the extractions
    // cleanup the SDK while passing in the final extraction values
    // which will be used as feedback to improve the future extraction accuracy:
    GiniBankConfiguration.shared.cleanup(paymentRecipient: "Payment Recipient",
                                         paymentReference: "Payment Reference",
                                         paymentPurpose: "Payment Purpose",
                                         iban: "IBAN",
                                         bic: "BIC",
                                         amountToPay: ExtractionAmount(value: 10.242, currency: .EUR))
}
Capturing documents
To launch the Gini Bank SDK you only need to:
Request camera access via configuring
Info.plistin your project.Configure
GiniBankConfiguration.shared. The implementation example can be found herePresent the
UIViewController. You can find the example hereHandle the extraction results.
For handling the extraction results you need to implementGiniCaptureResultsDelegate. Here you can find the implementation example.Cleanup configuration and resources while also providing the required extraction feedback to improve the future extraction accuracy. You don’t need to implement any extra steps, just follow the recommendations below:
- Please provide values for all necessary fields, including those that were not extracted.

- Provide the final data approved by the user (and not the initially extracted only).

- Do cleanup after TAN verification.
   GiniBankConfiguration.shared.cleanup(paymentRecipient: "Payment Recipient",
                                   paymentReference: "Payment Reference",
                                   paymentPurpose: "Payment Purpose",
                                   iban: "IBAN",
                                   bic: "BIC",
                                   amountToPay: ExtractionAmount(value: 10.242, currency: .EUR))
Check out the example app to see how an integration could look like.