Integration
The Gini Bank SDK has two main features: capturing invoices for information extraction and handling payment requests. Both can be used independently and you may opt to use only one or both in your app.
Capturing Invoices
The capture feature uses our Gini Capture SDK to provide Activities and Fragments to capture invoices and prepare them for upload to the Gini Bank API. It also allows documents to be imported from other apps. The captured images can be reviewed and are optimized on the device to provide the best results when used with the Gini Bank API.
Android Manifest
The capture feature of the SDK uses the camera therefore the camera permission is required:
<manifest xmlns:android="http://schemas.android.com/apk/res/android"
    package="...">

    <uses-permission android:name="android.permission.CAMERA" />

</manifest>
Note
Make sure you request the camera permission before starting the SDK.
Requirements Check
We recommend running our runtime requirements check first before launching the Gini Capture SDK to ensure the device is capable of taking pictures of adequate quality.
Simply run GiniBank.checkCaptureRequirements() and inspect the returned RequirementsReport for the result:
Note
On Android 6.0 and later the camera permission is required before checking the requirements.
final RequirementsReport report = GiniBank.checkCaptureRequirements((Context) this);
if (!report.isFulfilled()) {
    final StringBuilder stringBuilder = new StringBuilder();
    report.getRequirementReports().forEach(requirementReport -> {
        if (!requirementReport.isFulfilled()) {
            stringBuilder.append(requirementReport.getRequirementId());
            stringBuilder.append(": ");
            stringBuilder.append(requirementReport.getDetails());
            stringBuilder.append("\n");
        }
    });
    Toast.makeText(this, "Requirements not fulfilled:\n" + stringBuilder,
            Toast.LENGTH_LONG).show();
}
Configuration
Configuration and interaction is done using CaptureConfiguration. To set the configuration use the
GiniBank.setCaptureConfiguration() static method.
You must call GiniBank.releaseCapture() after the user has seen (and potentially corrected) the extractions. You
need to pass the updated extraction values to releaseCapture(). If the SDK didn’t return any extractions you can
pass in empty strings.
Failing to call GiniBank.releaseCapture() will throw an IllegalStateException when
GiniBank.setCaptureConfiguration() is called again.
To view all the configuration options see the documentation of CaptureConfiguration.
Information about the configurable features are available on the Capture Features page and UI customization options can be viewed in the Customization Guide.
Tablet Support
The Gini Bank SDK can be used on tablets, too. Some UI elements adapt to the larger screen to offer the best user experience for tablet users.
Many tablets with at least 8MP cameras don’t have an LED flash. Therefore we don’t require flash for tablets. For this reason the extraction quality on those tablets might be lower compared to smartphones.
On tablets landscape orientation is also supported (smartphones are portrait only). We advise you to test your integration on tablets in both orientations.
In landscape the camera screen’s UI displays the camera trigger button on the right side of the screen. Users can reach the camera trigger more easily this way. The camera preview along with the document corner guides are shown in landscape to match the device’s orientation.
Other UI elements on all the screens maintain their relative position and the screen layouts are scaled automatically to fit the current orientation.
Networking
The Gini Bank SDK allows you to use the default networking implementation of our Gini Capture SDK to communicate with the Gini Bank API. You may also implement your own networking layer.
Note
You should have received Gini Bank API client credentials from us. Please get in touch with us in case you don’t have them. Without credentials you won’t be able to use the Gini Bank API.
We provide the GiniCaptureNetworkService interface which is used to upload, analyze and delete documents. See the
reference documentation
for details.
Default Implementation
The capture feature is not aware of any networking implementations and requires you to set them in the
CaptureConfiguration.
The default networking implementations is GiniCaptureDefaultNetworkService. We provide you with a helper method
to create it with minimal configuration:
val networkService = getDefaultNetworkService(
    context = this,
    clientId = myClientId,
    clientSecret = myClientSecret,
    emailDomain = myEmailDomain,
    documentMetadata = myDocumentMetadata
)
For all configuration options of the default networking implementation see the documentation of GiniCaptureDefaultNetworkService.Builder.
Retrieve the Analyzed Document
You can call GiniCaptureDefaultNetworkService.getAnalyzedGiniApiDocument() after the Gini Bank SDK has returned
extractions to your application. It returns the Gini Bank API document which was created when the user uploaded an
image or pdf for analysis.
When extractions were retrieved without using the Gini Bank API, then it will return null. For example when the
extractions came from an EPS QR Code.
Note
Make sure to call it before calling GiniBank.releaseCapture(). Otherwise the analyzed document won’t be
available anymore.
Custom Implementation
You can also provide your own networking by implementing the GiniCaptureNetworkService interface.
You may also use the Gini Bank API Library for Android or implement communication with the Gini Bank API yourself.
Cleanup and Sending Feedback
Your app should clean up the SDK by releasing the capture singleton and providing feedback for the extractions the Gini Bank API delivered. Feedback should be sent only for the extractions the user has seen and accepted (or corrected).
fun stopGiniBankSDK() {
    // After the user has seen and potentially corrected the extractions
    // cleanup the SDK while passing in the final extraction values
    // which will be used as feedback to improve the future extraction accuracy:
    GiniBank.releaseCapture(this,
            paymentRecipient,
            paymentReference,
            paymentPurpose,
            iban,
            bic,
            amount
        )
}
We provide a sample test case here to verify that extraction feedback sending works. You may use it along with the example pdf and json files as a starting point to write your own test case.
The sample test case is based on the Bank API documentation’s recommended steps for testing extraction feedback sending.
For additional information about feedback see the Gini Bank API documentation.
Capture Flow
To use the capture flow you only need to:
Request camera access,
Configure the capture feature using the
CaptureConfiguration,Register an activity result handler with the
CaptureFlowContract(),Launch the SDK with
GiniBank.startCaptureFlow(),Handle the extraction results,
Cleanup the SDK by calling
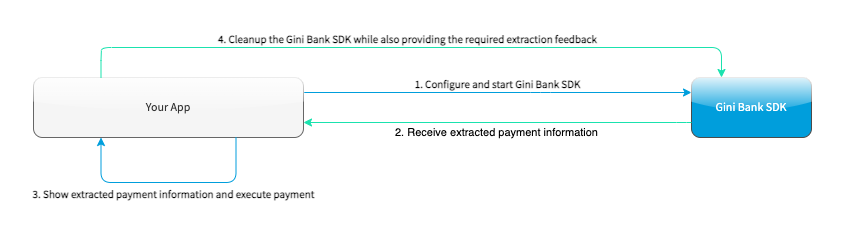
GiniBank.releaseCapture()while also providing the required extraction feedback to improve the future extraction accuracy. You don’t need to implement any extra steps, just follow the recommendations below:- Please provide values for all necessary fields, including those that were not extracted.
- Provide the final data approved by the user (and not the initially extracted only).
- Do cleanup after TAN verification.
The following diagram shows the interaction between your app and the SDK:
Note
Check out the example app to see how an integration could look like.
The following example shows how to launch the capture flow and how to handle the results:
// Use the androidx's Activity Result API to register a handler for the capture result.
val captureLauncher = registerForActivityResult(CaptureFlowContract()) { result: CaptureResult ->
    when (result) {
        is CaptureResult.Success -> {
            handleExtractions(result.specificExtractions)
        }
        is CaptureResult.Error -> {
            when (result.value) {
                is ResultError.Capture -> {
                    val captureError: GiniCaptureError = (result.value as ResultError.Capture).giniCaptureError
                    handleCaptureError(captureError)
                }
                is ResultError.FileImport -> {
                    // See the File Import section on the Capture Features page for more details.
                    val fileImportError = result.value as ResultError.FileImport
                    handleFileImportError(fileImportError)
                }
            }
            GiniBank.releaseCapture(
                this, "",
                "", "", "", "", Amount.EMPTY
            )
        }
        CaptureResult.Empty -> {
            handleNoExtractions()
            GiniBank.releaseCapture(
                this, "",
                "", "", "", "", Amount.EMPTY
            )
        }
        CaptureResult.Cancel -> {
            handleCancellation()
            GiniBank.releaseCapture(
                this, "",
                "", "", "", "", Amount.EMPTY
            )
        }
        CaptureResult.EnterManually -> {
            handleEnterManually()
            GiniBank.releaseCapture(
                this, "",
                "", "", "", "", Amount.EMPTY
            )
        }
    }
}

fun launchGiniCapture() {
    // Make sure camera permission has been already granted at this point.

    // Check that the device fulfills the requirements.
    val report = GiniCaptureRequirements.checkRequirements((Context) this)
    if (!report.isFulfilled()) {
        handleUnfulfilledRequirements(report)
        return
    }

    // Instantiate the networking implementation.
    val networkService: GiniCaptureNetworkService  = ...

    // Configure the capture feature.
    GiniBank.setCaptureConfiguration(
        CaptureConfiguration(
            networkService = networkService,
            ...
        )
    )

    // Launch and wait for the result.
    GiniBank.startCaptureFlow(captureLauncher)
}

fun stopGiniBankSDK() {
    // After the user has seen and potentially corrected the extractions
    // cleanup the SDK while passing in the final extraction values
    // which will be used as feedback to improve the future extraction accuracy:
    GiniBank.releaseCapture(this,
            paymentRecipient,
            paymentReference,
            paymentPurpose,
            iban,
            bic,
            amount
        )
}
Handling Payment Requests
The Gini Bank SDK enables your app to handle payment requests started by other Gini SDKs (e.g., Gini Health SDK) in another app. You can retrieve the payment requests’s content, mark the payment request as payed and also return your user to the app that created the payment request.
Networking
The pay feature depends on the Gini Bank API Library, which
provides an entry point through the GiniBankAPI class.
Note
You should have received Gini Bank API client credentials from us. Please get in touch with us in case you don’t have them. Without credentials you won’t be able to use the Gini Bank API.
The GiniBankAPI class can be built either with client credentials or with a SessionManager if you already have an
authorization token. We provide helper methods for each case:
getGiniApi(context: Context, clientId: String, clientSecret: String,
           emailDomain: String)
getGiniApi(context: Context, sessionManager: SessionManager)
SessionManager is an interface which you need to implement to send the token.
For more details about the GiniBankAPI class see the Gini Bank API Library’s documentation.
Once you have a GiniBankAPI instance you need to pass it to GiniBank.setGiniApi():
val giniApi = getGiniApi(this, myClientId, myClientSecret, myEmailDomain)

GiniBank.setGiniApi(giniApi)
Android Manifest
To be able to receive payment requests you need to add an intent filter for the ginipay URI to your manifest. This also allows other Gini SDKs (e.g., Gini Health SDK) to detect if your app is installed:
<intent-filter>
    <action android:name="android.intent.action.VIEW" />

    <category android:name="android.intent.category.DEFAULT" />

    <data
        android:host="payment"
        android:scheme="ginipay" />
</intent-filter>
The intent filter can be added to the activity which will handle the payment flow of that payment request.
Package Name
You also need to tell us your app’s package name. It will be associated with the payment provider we create for your banking app in the Gini Bank API. Other Gini SDKs (like the Gini Health SDK) will only open your banking app if it is installed and it has the same package name as the one known by the Gini Bank API.
If you have different package names for development and production then please share both of them with us so that we can use the right one for each environment.
Receive Payment Requests
Note
You can see an example implementation in the example app’s pay package.
When your activity is launched with an intent you should follow the steps below to receive and handle the payment request:
Extract the payment request id from the intent with
getRequestId():val requestId = getRequestId(intent)
Retrieve the payment details set by other Gini SDKs (like the Gini Health SDK) using
GiniBank.getPaymentRequest():val paymentRequest: PaymentRequest = giniBank.getPaymentRequest(requestId)
Show the payment details to your user:
showPaymentDetails(
    paymentRequest.recipient,
    paymentRequest.iban,
    paymentRequest.bic,
    paymentRequest.amount,
    paymentRequest.purpose
)
After your user has initiated the payment mark the payment request as paid using
GiniBank.resolvePaymentRequest():// The actual payment details used for the payment (as corrected and accepted by the user). val usedPaymentDetails = ResolvePaymentInput( recipient = "...", iban = "...", bic = "...", amount = "...", purpose = "..." ) val resolvedPayment: ResolvedPayment = giniBank.resolvePaymentRequest(requestId, usedPaymentDetails)
You can allow your user to return to the app that started the flow using
GiniBank.returnToPaymentInitiatorApp():giniBank.returnToPaymentInitiatorApp(context, resolvedPayment)
Testing
Testing the payment feature requires an app which uses a Gini SDK which can create payment requests. The Gini Health SDK is one such SDK. You can use it to create payment requests and to forward them to your banking app to view and resolve those payment requests.
Requirements
Example app for creating payment requests
An example app is available in the Gini Health SDK’s repository.
You can use the same Gini Bank API client credentials in that example app as in your app, if not otherwise specified.
Development Gini Bank API client credentials
In order to test using the example app you need to use development client credentials. This will make sure the example will use a payment provider which will open your development banking app.
End to end testing
After you’ve set the client credentials in the Gini Health SDK’s example app you can install it along with your banking app on your device.
Run the example app and import an invoice or take a picture of one to start the payment flow.
After following the integration steps above your banking app will be launched and you’ll be able to fetch the payment request, show the payment information and resolve the payment after the transaction has been confirmed. At this point, you may redirect back to the example app.
With these steps completed you have verified that your app, the Gini Bank API, the Gini Health SDK and the Gini Bank SDK work together correctly.
Testing in production
The steps are the same but instead of the development client credentials you will need to use production client credentials. This will make sure the Gini Health SDK receives real payment providers including the one which opens your production banking app.
For testing the flow using the example app please make sure that the production client credentials are used before installing it.
You can also test with a real app which uses the Gini Health SDK (or another similar Gini SDK). Please contact us in case you don’t know which app(s) to install for starting the payment flow.